
A few years ago we created Summer Refreshers, a fun pattern for the Row by Row experience. We are bringing it back now to cool you down during the summer heat. The pattern provides instructions for four block based beverages. Make one or make them all, and use it as a table runner, mini quilt, or even create placemats.
Supplies Needed:
Low volume background print – 1/3 yard
Light gray for glassware – Fat Eighth (9″ x 18″)
(1) 9″ square each of the following:
- Striped fabric for the straw
- Light pink, lime green, lemon yellow and peach fabric for the beverages
- Scraps of fruit fabric to garnish your drinks
- Backing and batting are dependent on what size you make
Don’t forget your basic sewing supplies:
- Sewing machine with new needle
- Aurifil 50wt thread in a coordinating color
- Rotary cutter, mat and ruler
- Scissors, pins, iron
Cutting Instructions:
Helpful Hint: Label your fabric as you go with the letter indicated! It will make finding the correct pieces to construct your blocks easier.
From your low volume background fabric cut:
(2) 3.5” strips. Sub-cut into:
- (6) 3.5” x 9.5” rectangles A
- With remaining cut (2) 2” x 9.5” rectangles B
(1) 1.5” strip. Sub-cut into:
- (6) 1.5” squares C
- (1) 1.5” x 2” rectangle D
- (1) 1.5” x 2.5” rectangle E
- (1) 1.5” x 3″ rectangle F
- (2) 1” x 1” squares G
(1) 3” strip. Sub-cut into:
- (1) 3” x 2” rectangle H
- (2) 3” x 2.25” rectangles I
- (4) 2.25” x 2.5” rectangles J
- (2) 2” x 5.5” rectangles K
- (1) 2” x 3.75″ rectangle L
- (2) 1.75” x 4” rectangles M
From the gray for the glassware cut:
(1) 3.5” x 18” strip. Sub-cut into:
- (1) 3.5” x 1.5” rectangle N
- (6) 3.5” x 1” rectangles O
From remaining cut:
- (1) 4” x 1” rectangle P
- (1) 6.5” x 1” rectangle Q
From the striped fabric for the straw cut the following on the bias:
- (2) .75” x 2” rectangles R
- (1) .75” x 2.50” rectangle S
- (1) .75” x 3” rectangle T
From the pink fabric cut:
- (1) 6.5” x 3.5” rectangle U
From the green fabric cut:
- (1) 3.5” x 1.5” rectangle V
- (1) 6.5” x 2.5” rectangle W
From the yellow fabric cut:
- (1) 6.5” x 3.5” rectangle X
From the peach fabric cut:
- (1) 6” x 3.5” rectangle Y
Sewing Instructions:
Helpful Hints: Our instructions include a 1″ grid in the image to help demonstrate the size and placement of pieces. All sewing uses a 1/4″ seam. Also. press after every step.
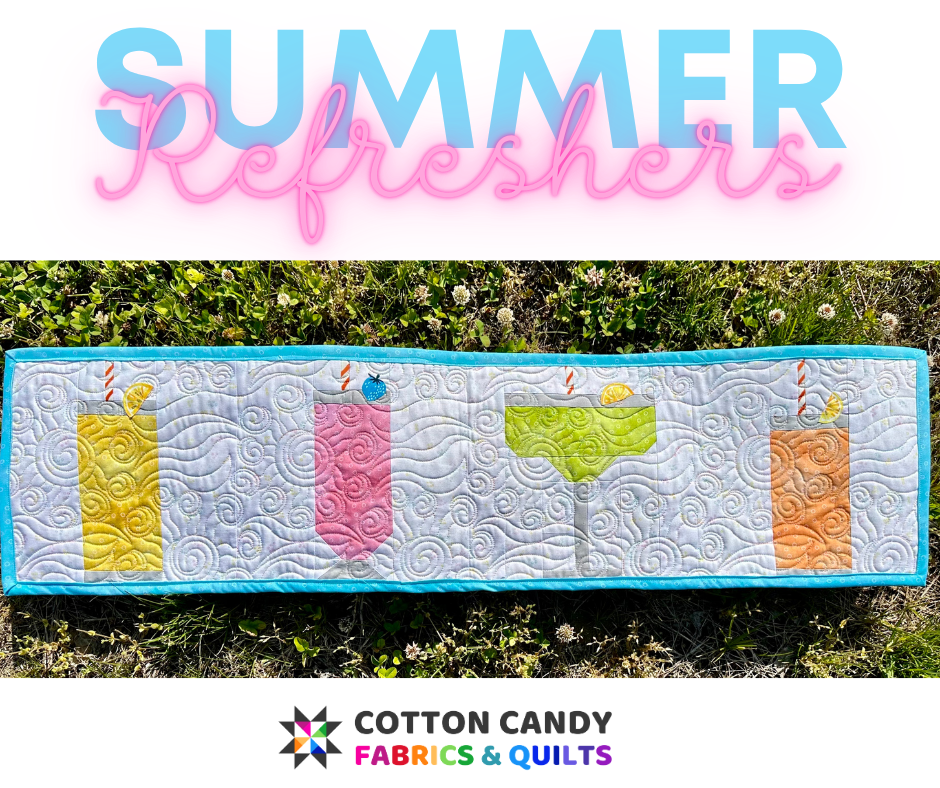
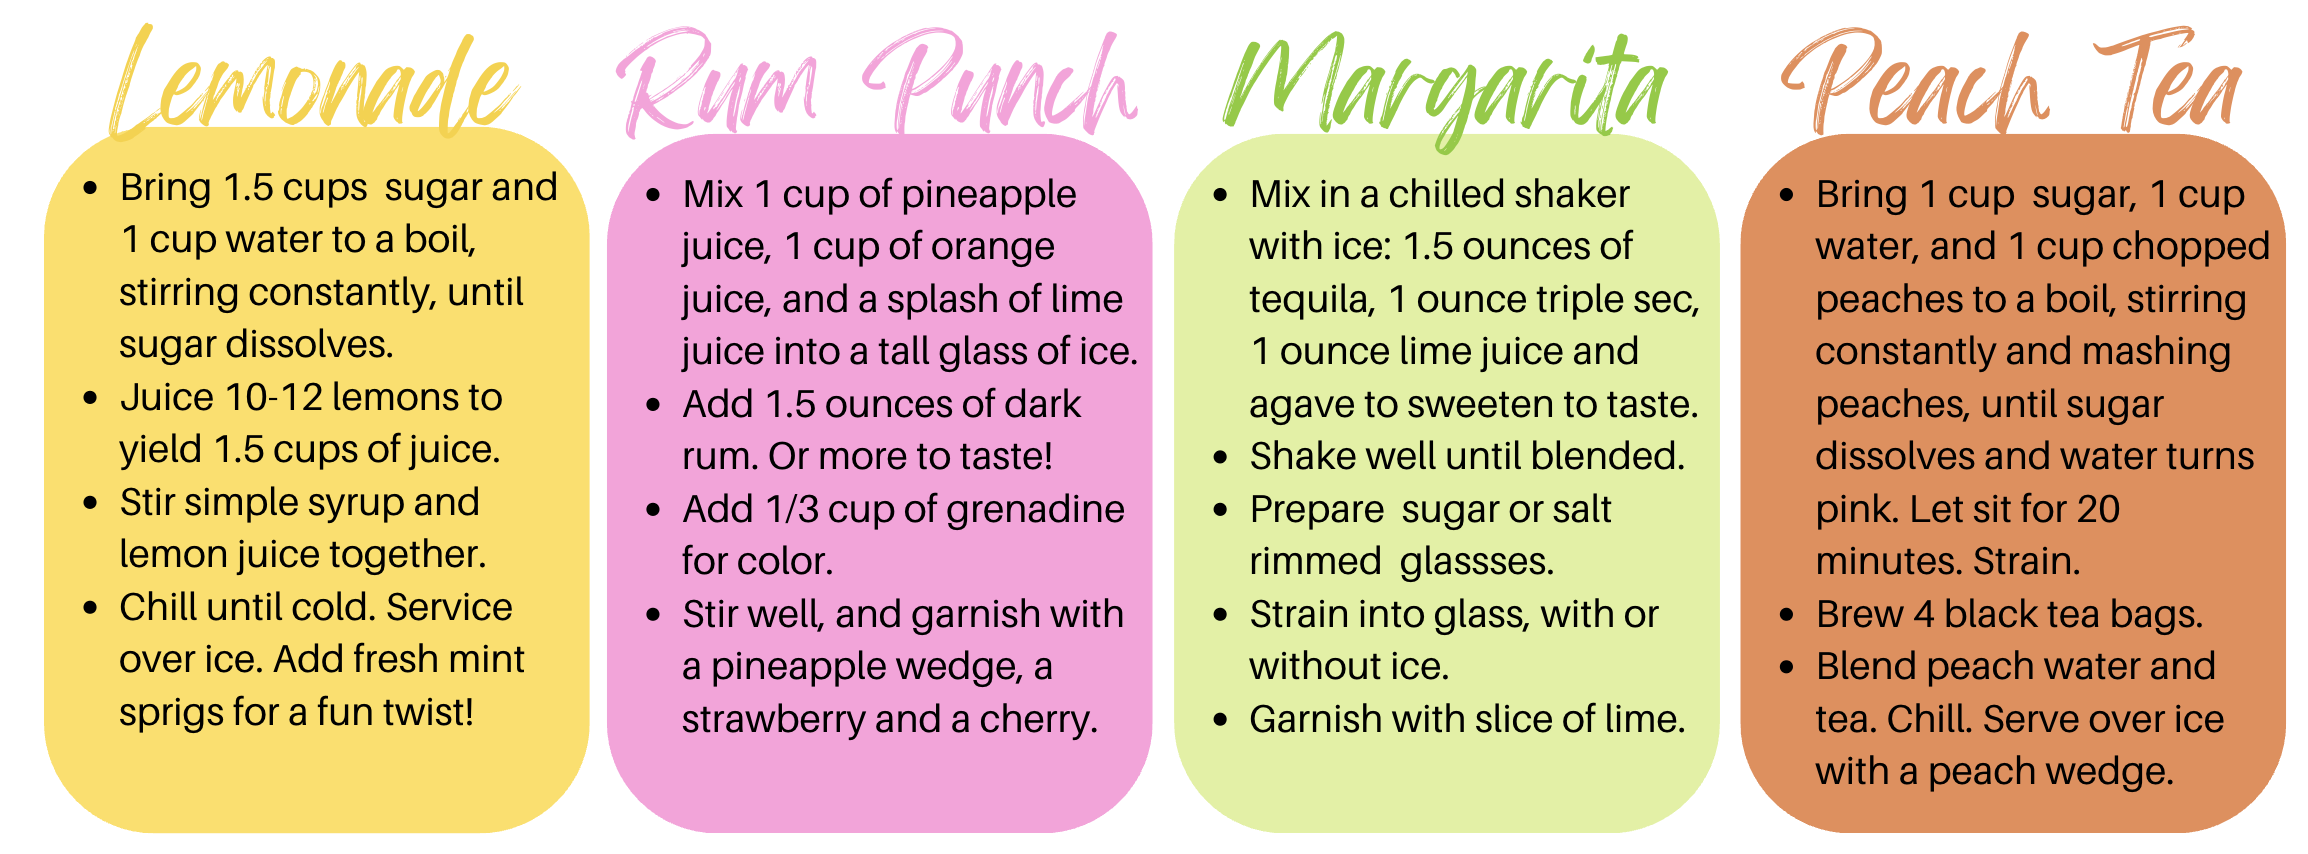
Make the Lemonade block:
- With right sides together, sew a gray 3.5” x 1″ N piece to either short side (top and bottom) the yellow X piece. This is the drink unit.
- Sew 1.5” x 2.5″ piece E to straw .75″ x 2.5″ piece S along long side.
- Sew 2.5” x 2.25” J piece along the other side. This is the straw unit.
- Sew the straw unit to the top of the drink unit.
- Sew a 3.5” x 9.5” background piece A to either side of your glass.
- Use your favorite method to applique a lemon wedge on to your beverage if desired.
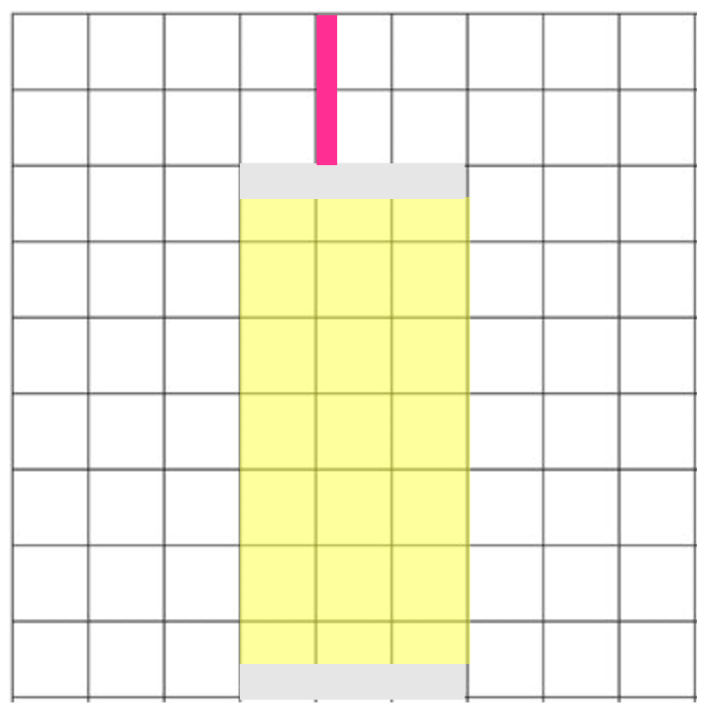
Make the Peach Tea block:
- Sew a gray 3.5” X 1″ N piece to either short side (top and bottom) of the peach 6″ x 3.35″ Y rectangle. This is the drink unit.
- Sew 3” x 1.5” F piece to straw T piece along long sides. Then sew 3” x 2.25” I piece along the other side. This is the straw unit.
- Sew the straw unit to the top of the drink unit.
- Sew a 3.5” x 9.5” background piece A to either side of your glass.
- Use your favorite method to applique a lemon wedge on to your beverage if desired.

Make the Rum Punch block:
Start with the Sew and Flip method described in the first four steps below and in the graphic below right.
- Using a ruler, draw a diagonal line from two corners on your 1.5″ C squares
- Layer a C square on top of a gray 3.5″ x 1.5 N rectangle, aligning the corners on one side with the drawn line being at the bottom corner. Sew along the drawn line.
- Trim 1/4″ from the sewn line, discarding excess. Open and press. Repeat on the other side of the N rectangle to form your drink base.
- Repeat process on other corner to make your drink base.
- Using steps 1-4 above, sew background C squares to the bottom of pink U rectangles. This is the drink.
- Sew a 3.5″ x 1″ O piece to the top (short side) of the drink.
- Sew 2” x 1.5” rectangle D to straw piece R along long sides.
- Then sew 2.25” x 2” rectangle J to straw along the other side. This is the straw unit.
- Sew the straw unit to the top of the drink unit.
- Sew the drink base to the bottom of the drink unit.
- Sew a 3.5” x 9.5” rectangle A to either side of your drink.
- Use your favorite method to applique a strawberry on to your beverage if desired.
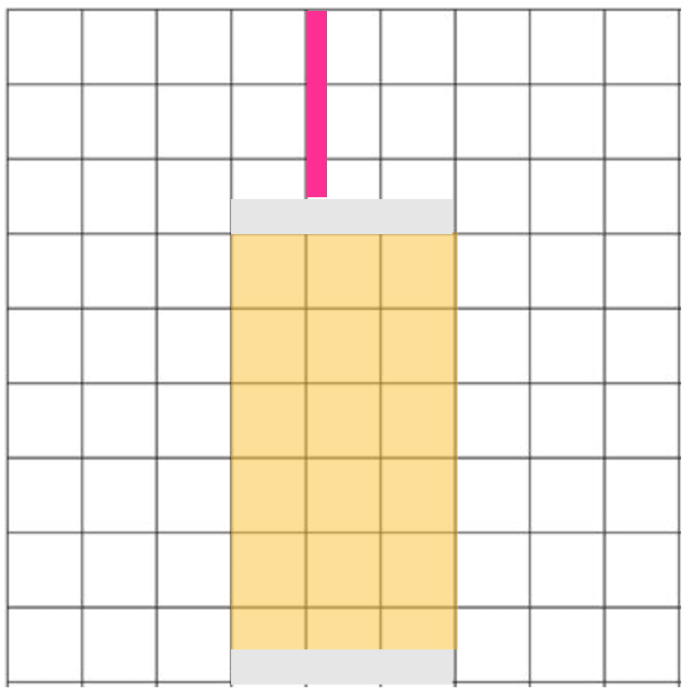
Make the Margarita block:
Utilize the Sew and Flip Method where applicable.
- Using a ruler, draw a diagonal line from two corners on your 1.5″ C squares
- Layer a C square on top of a green 3.5″ x 1.5″ V rectangle, aligning the corners on one side with the drawn line being at the top corner. Sew along the drawn line.
- Trim 1/4″ from the sewn line, discarding excess. Open and press.
- Repeat on the other side of the V rectangle to form the bottom of the drink.This is the drink bottom.
- Sew a 1.75” x 4” rectangle M piece to either side of the 4” x 1” gray P rectangle along the long sides to form the stem.
- Sew 3.5” x 1” gray rectangle O to bottom of the stem.
- Sew drink bottom to top of stem unit.
- Sew a 2.25” x 5.5” rectangle K to either long side of stem unit. This is the stem / bottom of drink.
- Using a ruler, draw a diagonal line from two corners on your 1″ G squares
- Layer a G square on bottom corner of a green 6.5″ x 2.5 W rectangle, aligning the corners on one side with the drawn line being away from the corner. Sew along the drawn line.
- Trim 1/4″ from the sewn line, discarding excess. Open and press.
- Repeat on the other side of the W rectangle to form the top of the drink.
- Sew 6.5” x 1” grau rectangle Q to long top of green drink.
- Sew 3” x 2”” rectangle H to straw .75″ x 2″ rectangle R along long sides of straw. Then sew 3.75” x 2” rectangle L to straw along other long side of straw. This is the straw unit.
- Sew straw unit to the top of the drink across the long sides.
- Sew the drink and straw unit to the stem / bottom of the drink unit forming a complete drink unit.
- Sew a 2” x 9.5” rectangle B to either side of your drink unit.
- Use your favorite method to applique a lemon on to your beverage if desired.
Finish your Row:
Arrange your rows in a horizontal layout for a table runner. Consider a vertical layout for a narrow wall hanging. Or, do a 2 x 2 layout and make a mini quilt to use as a wall hanging or table mat. Either way, make yourself a refresher! You’ve earned it!
Please enjoy this pattern for your personal use. If you’d like to have a formatted copy, you can access a link here: https://www.canva.com/design/DAGrSamgP58/EpDQRff5IZ8VIC5HNIVJTw/view?utm_content=DAGrSamgP58&utm_campaign=designshare&utm_medium=link2&utm_source=uniquelinks&utlId=h93dac7a337
Please tag us on social media if you make this pattern as we’d love to see your work:
Instagram: @cottoncandyfabricshop
Facebook: @cottoncandyfabrics
